
Whether you’re launching a podcast from your basement, recording an audiobook, or building an online coaching business, you need a home recording studio. But it doesn’t have to cost you a fortune or involve extensive renovation.
It’s actually really easy to do. And to take the guesswork out of it, I’ve put together a comprehensive guide of the equipment you need to buy to produce quality audio and video content that your tribe of raving fans can’t get enough of.
But before we look at the essential gear you’ll need, let’s discuss the benefits of building a home studio.
%20-%202024-03-15T210751.197.jpg)
Absolutely. Billie Eilish recorded her Grammy-winning debut album from a self-built, home recording studio and look at her today. She wrote the latest James Bond theme track and was featured on the cover of Vogue. That would never have been possible 15 or 20 years ago.
So technology has dramatically changed the way we do business. It’s allowed coaches, consultants, and creatives to build recording studios and 7-figure businesses from the comfort of their homes.
Booking a professional recording studio can cost you upwards of $200 an hour. Now imagine if you’re recording an online course or an audiobook. It could easily take you 40-80 hours to produce. Think about how many copies you’d need to sell before you break even.
Plus, having that studio in-house means when inspiration strikes, you can hit the record button and work your magic, night or day.
So the long-term benefits of creating a recording studio are cost-savings, convenience, and business growth. Now, what would you expect to pay?
Just tell us where to send it...
We respect your email inbox and will never spam.

Price really is a matter of budget. What are you willing to spend? I spent a little over $4,000 on my home recording studio and that wasn’t including my Macbook Pro which I already had.
You can build a recording studio for a lot less ($500) or a lot more ($30,000) depending on your goals. I want to launch a Top 100 marketing podcast. To do that, I need top-quality home recording studio equipment.
If you’re in the beginning stages of building a virtual consultancy, or a small niche podcast, start small. You don’t need to invest in fancy lighting equipment, or the best podcast microphone, or video podcast equipment. You can purchase entry-level equipment without sounding like an amateur.
Just don’t do things on the cheap. Every time I’ve done something the cheapest way, I’ve usually regretted it and ended up paying a lot more further down the line.
If you’re serious about turning your home studio into a lifestyle business, then be prepared to pay once, cry once. Yes, it’s expensive. Yes, it hurts. But with the right recording studio setup, you’re going to recoup your investment much faster.
So here are the podcast tools you’ll need for your home recording studio.
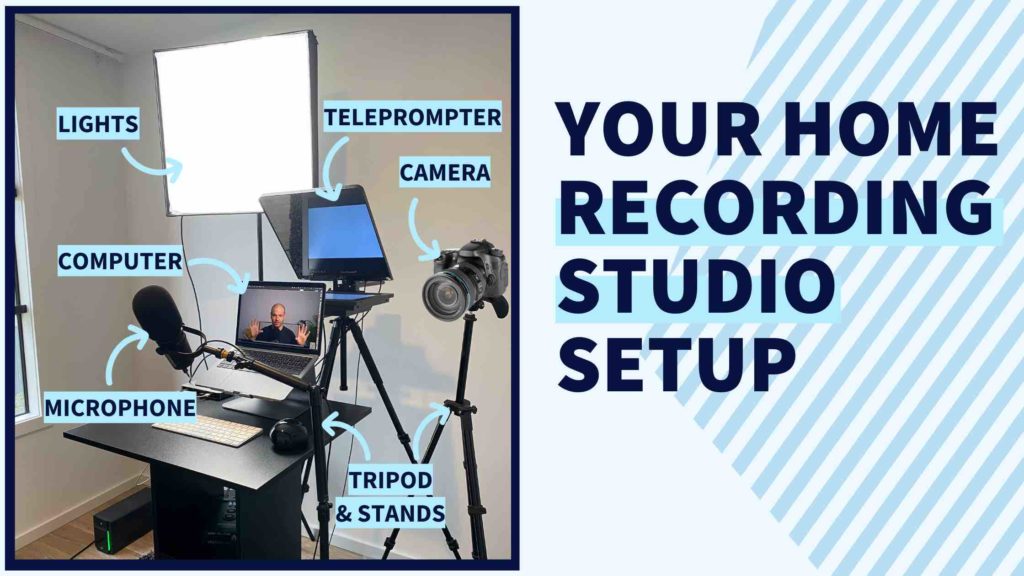
Your computer is arguably your biggest expense when setting up your home recording studio. This is the tool you’ll be working on every day so you need to be sure you’ve got a computer with enough memory and disk space. You’ll be installing production software and working with large video and audio files, so you need a computer that can cope.
You also need to think long-term. Do you want to be working off a small laptop screen or a desktop computer with a much larger monitor?
I have a Macbook Pro, but if you’re cash strapped, stick with your existing computer and upgrade once you can afford it.
Here’s the computer I’d get: (Amazon)
Now let’s talk about lighting.

Good lighting is vital if you’ll be filming videos for social media platforms like TikTok, Instagram, and YouTube.
If you’re a business coach or consultant launching an online course with video content, you want it to be slick. And it won’t be if your face is partially hidden in shadow or you’re sweating profusely because you’ve got a flashlight aimed at you.
I also appreciate a well-lit room when I’m jumping on calls with clients or presenting a talk to a virtual audience. So you want to recreate an in-person experience as much as possible.
You can hire an electrician to rewire your designated studio space, but that’s really expensive and unnecessary. Instead, invest in good lighting equipment for a fraction of the cost.
Here is all the lighting equipment you’d need:
Get it on camera. Visual quality is everything, especially if you want to capture video content that you can repackage for social media, online courses, and your blog. Your time is money, and wasting it filming multiple reiterations of the same theme just doesn’t make business or financial sense.
And a poor quality video image will negatively impact your tribe's experience of your brand. People won’t watch it if the image is grainy.
By investing in a good camera, you can film high-quality video content that your editor can tweak and repurpose as needed. I’m a fan of Sony. So I purchased the Sony Alpha a6400 mirrorless camera. Its real-time tracking and excellent light sensitivity are great for shooting moving images.
For example, as a coach, I’ll sometimes share thought-starters while driving or out walking my dog, and I need it to feel like my viewers are there with me. So I want to create that in-person experience, and this camera helps me do just that.
For content creators, I’d advise you check out the Logitech StreamCam. It auto-adjusts the focus as you move, so it’s great for live streaming and creating engaging high-definition videos.
Next, you want to think about sound.

Audio is by far one of the most important elements of your home studio.
If you’re just starting out, you probably won’t be able to build a sound-treated studio. Let’s be honest; it’s expensive. And unless you’re the only inhabitant of a private island or located in the middle of a forest, finding a noise-free zone won’t be easy.
What you need is a podcast microphone with voice isolation technology.
I love the Shure Motiv because it has built-in headphone monitoring and voice control, meaning it automatically adjusts your vocal tone. So it won’t matter if you move away from the speaker, the microphone will adjust your voice tone in real-time. Just set it to auto-level mode and the microphone does the hard work for you.
If you’re not a techie like me, it really is the best podcast microphone. You won’t have to spend a ton of time in post-production editing the recording. It stops unwanted background noises from creeping in— so blaring car horns or kids running rampant down your hallway won’t be a problem.
Best of all, it connects via Bluetooth, so you don’t need a USB plug-in. And it is compatible with all professional interfaces.
I’d also advise that you purchase a windscreen for your microphone. This is a foam-like cover that you place over your microphone to reduce wind noise and cut out unwanted breath which can quickly become distracting and detract from the experience.
I bought the Shure A7WS Windscreen but you’ll want to buy one that fits your brand of microphone.
You’re also going to need to purchase a stand for your microphone. If you’d like a microphone that comes standard with a stand, check out the Blue Yeti USB Mic for Recording and Streaming. It’s ideal for podcasts and YouTube video creators.
Imagine you’re giving an hour-long presentation. The last thing you want to be doing is holding your microphone for the duration of the talk.
You also don’t want to be adjusting and readjusting your microphone or video recorder while hosting a podcast or filming a course. So investing in a modular rigging system is essential. You can also use it for freestanding cameras and lights.
A multi-mount and flex arm lets you position and lock your equipment so you can focus on inspiring your audience. You’ll also need to purchase a multi-mount weighted base.
Your camera and lighting equipment is expensive. It’s not something you want to worry about falling over. Using a heavy-duty weighted base gives you confidence in knowing that your equipment won’t get damaged.
To recap, these are the light stands and tripods I’d recommend:
Remember, you can buy all of this equipment from Amazon or B&H. Now, let’s talk about tripods.
You need a tripod to mount your video camera or teleprompter (I’ll get to this in a bit). I use the Manfrotto 290 XTRA Kit with video head. It’s made from solid aluminum and has adjustable legs to position your camera at a height that works for you.
Unlike a weighted base, it’s easily movable. So if you want to change up the scenery and shoot a thought piece at the beach, just grab your tripod and off you go. And at $350 it won’t break the bank.
Back to that teleprompter I mentioned.
Why do you need a teleprompter? If you’re anything like me, you speak off the cuff. You’ve got notes jotted down which you use as thought starters, but for the most part, you’re freestyling.
This is where a teleprompter comes in handy. Use it to maintain eye contact with your audience without having to glance down at a piece of paper to remind you what comes next. It’s all there, in your line of vision, and your audience would never know because it looks like you’re locked on them.
So whether you’re hosting a video podcast or filming course material, you want to invest in a teleprompter. It takes the pressure out of presenting educational material.
Lastly, accessorize.
If you’re working with dual monitors, a camera, teleprompter, microphone, and laptop you’re going to need something to plug everything into. I’d recommend the Plugable Thunderbolt 3 and USB Docking Station.
Not only is it compatible with Mac and Windows, but it also has 11 ports of connectivity.
I’d also look at investing in the Elgato Cam Link 4K. It enhances your video image, delivering far more compelling and captivating visual content. All you need to do is connect it to your camera and computer then hit the record button.
It’ll ensure that you never have to worry about maxing out your memory card in the middle of your recording session.
And that’s all the equipment you need. Next, I want to talk about choosing your designated recording room.
This is probably one of the most important decisions you’ll make when it comes to setting up your home recording studio. You need a space that can house all of your recording equipment, provide excellent acoustics, and be insulated from outside noises.
Some people will tell you to invest in soundproofing (foam rubber insulation on the walls and ceiling) but that can be costly when you’re starting out.
My top tip: choose a room with a carpet, and preferably no windows. This acts as a buffer against outside noise. If you’re like me, and you need a view, make sure the window frames seal tight or add heavy curtains to reduce the echo.
And those are my top tips.
Now that you know the recording equipment you need, start planning your next steps. If you’re on a tight budget, decide what gear you need to buy first, and what you can live without for a little while. Then get it done.
Only invest in a new computer if it fits into your budget. Otherwise, start filming and launch your podcast, coaching business, or course and see how things go. Test it on the market, and get feedback from your audience.
Is the visual and sound quality good enough? What could be improved? Then take action. Good luck, and have fun.
You'll get new articles delivered straight to your inbox, plus special subscriber-only content such as podcasts, videos and live training events.

Get free weekly emails that make you smarter at marketing and help you grow your business